ADVERTISEMENT
I absolutely must have this in my life!
Use sandpaper to lightly sand the surface of the tins, which helps the paint adhere better.
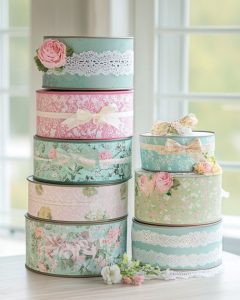
If you want a uniform look, spray or paint the tins with your chosen color. Allow them to dry completely.
Measure and cut decorative paper or fabric to fit the sides and lids of the tins if you wish to add patterns or textures.
Apply Mod Podge to the surface of the tin and carefully place the paper or fabric on it, smoothing out any bubbles.
Seal the surface with another layer of Mod Podge or clear sealant to protect the design.
Use the hot glue gun to attach any additional decorative elements, such as ribbons or lace, to enhance the vintage look.
Allow everything to dry thoroughly before using the tins as organizers.
Like DIY Everywhere – Arts & Crafts for more
Variations & Tips
To personalize your vintage cookie tin organizers, consider experimenting with different colors and patterns. Use metallic paints for a more glamorous look, or opt for pastel shades for a softer, shabby-chic style. You can also decoupage images or vintage labels onto the tins for added character. For a more rustic look, wrap the tins in burlap or twine. If you prefer a more modern twist, use geometric patterns or bold colors. These variations allow you to tailor the project to suit your personal taste and the existing decor of your home.
For Complete Cooking STEPS Please Head On Over To Next Page Or Open button (>) and don’t forget to SHARE with your Facebook friends
ADVERTISEMENT
