A homemade face toner is a refreshing and cost-effective way to take care of your beauty needs, especially during the summer. While toners might not be the first preference for many, they are a must-have in your beauty routine, particularly if you have oily, acne-prone skin with large pores. A good toner helps remove excess oil, dirt, and impurities, shrinks pores, and restores the pH balance of your skin. The best part is that toners are versatile and extremely simple to make. Here are my top 5 homemade skin toner recipes for different skin types and issues.
Image preview
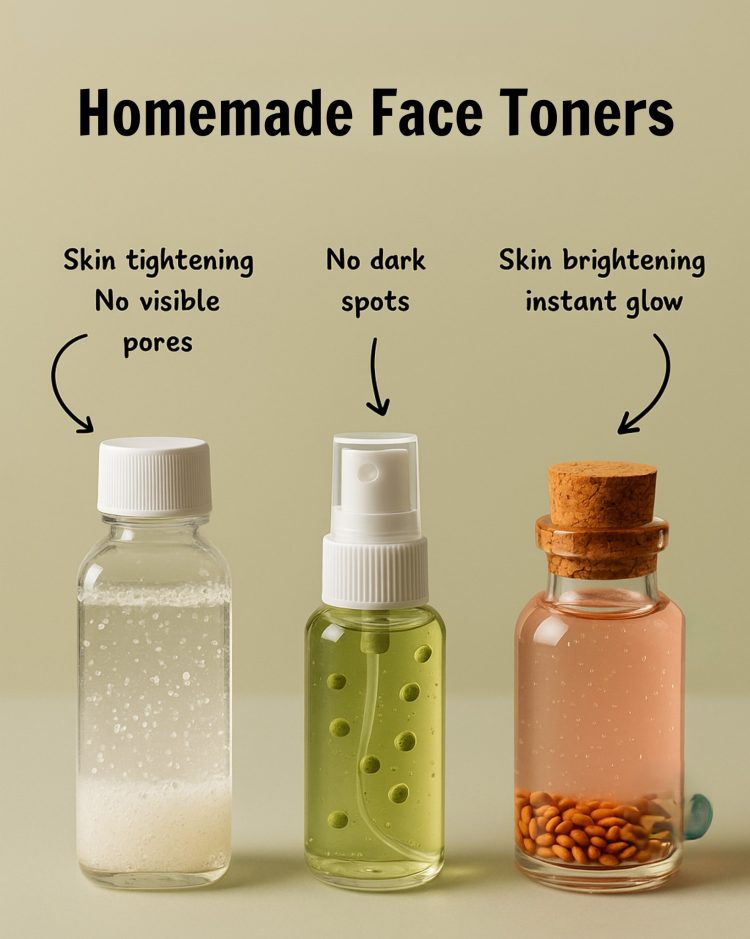
1. Rice Water Toner
Ingredients:
1/2 cup rice
Water
Instructions:
Rinse the rice thoroughly by changing the water 2-3 times to remove any dirt or impurities.
Place 1/2 cup of washed rice in a bowl and pour water over the rice. Soak for 30-45 minutes.
Strain the rice water into a clean spray bottle.
Spray the rice water on your face after cleansing with a mild cleanser.
Benefits:
Minimizes the appearance of pores and tightens the skin.
Helps heal acne and cools the redness of an outbreak.
Achieves clear, porcelain skin by diminishing dark spots and blemishes.
2. Cucumber Toner
Ingredients:
1 cucumber
1 cup of water
Instructions:
Take a fresh cucumber and chop it into small pieces. Blend the cucumber and water.
Filter the juice using a sieve. Store it in a spray bottle and let it chill in the refrigerator for some time.
Apply the chilled cucumber toner onto your face using a cotton pad.
Benefits:
Heals sunburnt skin and brings instant relief.
Improves and rejuvenates your skin.
Helps treat freckles and blemishes.
Drink cucumber juice daily for naturally glowing skin.
3. Potato Juice Toner
Ingredients:
1 medium-sized potato
1 cup of water
Instructions:
Take a fresh potato and chop it into small pieces. Blend the potato and water.
Filter the juice using a sieve.
Apply this toner onto your face using a cotton pad.
Benefits:
Makes your skin clear by removing dark spots and blemishes, preventing aging, and correcting uneven skin tone.
Reduces wrinkles by increasing skin elasticity.
Use it daily to treat dark spots and hyperpigmentation.
4. Rose Water Toner
Ingredients:
Fresh rose petals
Water
Instructions:
Wash rose petals thoroughly to remove any dirt particles and residue.
Place the rose petals in a stainless-steel pot and pour distilled water over the petals. Add just enough water to cover the petals.
Heat the water on a low flame and cover the pot with a lid. Allow the water to steam until the petals have lost their color and the water has taken on the color of the rose petals.
Turn off the flame and let it cool down. Strain the water and store it in a spray bottle for easy use.
Keep it in the refrigerator for longer use. Spray chilled rose water on your face two to three times a day.
Benefits:
Works extremely well to keep your skin healthy and grease-free.
Soothes, nourishes, and hydrates the skin while restoring your skin’s natural pH levels.
Amazing for sensitive skin as it won’t dry it out.
Keeps your skin cool, imparting elasticity to your skin texture and preventing acne breakouts.
5. Green Tea Toner
Ingredients:
Green tea leaves (1 bag)
1 cup of water
1 tablespoon rose water
Lemon essential oil
Instructions:
Pour 1 cup of water into a small pan. Bring it to a boil on a low flame.
Add green tea leaves. Let it brew for a couple of minutes.
Turn off the flame when the water takes on the color of green tea. Cover the pan with a lid and let it cool down.
Pour the tea into a glass bowl. Mix in the remaining ingredients: 1 tablespoon of rose water and a few drops of lemon essential oil.
Transfer the concoction into a spray bottle and shake well before use. Store it in the refrigerator so that it can last for up to 1 week.
Spray chilled green tea toner all over your face and neck. Use it daily. If you have oily, acne-prone skin, use this toner several times a day.
Benefits:
Green tea is rich in antioxidants that help fight free radicals and reduce inflammation.
Rose water soothes and hydrates the skin.
Lemon essential oil adds a refreshing scent and additional skin benefits.
Glass Skin Transformation In 7 Days With Rice
Dreaming of flawless, glowing skin? Achieving “glass skin”—a complexion that looks smooth, radiant, and poreless—is easier than you think. This week-long DIY remedy uses the power of rice to nourish and transform your skin from within.
In this guide, you’ll learn how to create your own rice-based face cream using simple, natural ingredients. Follow this routine daily, and you’ll start to see visible improvements in just 7 days.
🌸 What You’ll Need:
½ cup of rice
2 teaspoons almond oil
1 teaspoon glycerin
1 vitamin E capsule
🧖♀️ Step-by-Step Preparation:
Clean the Rice: Rinse ½ cup of rice thoroughly to remove dirt and impurities.
Cook: Boil the rice in enough water for 15–20 minutes until soft.
Mash: Drain any excess water and mash the rice into a smooth paste. Let it cool.
Add Nourishment: Mix in 2 tsp of almond oil and 1 tsp of glycerin.
Enrich with Vitamin E: Pierce the vitamin E capsule and squeeze a few drops into the mixture.
Blend: Stir or blend well until you achieve a creamy texture.
Your homemade rice face cream is now ready!
🌙 How to Use:
Apply this cream every night before bedtime as your night moisturizer.
Gently massage it into your face for a few minutes to promote absorption.
If your skin allows, leave it on overnight for maximum effect.
Otherwise, keep it on for 30 minutes, then gently wipe off with a warm, damp cloth.
🌟 Results to Expect:
With consistent use for 7 days, you’ll notice:
Softer, brighter, and more even-toned skin
Reduced scars and dark spots
A natural, radiant glow that mimics the glass skin look
Give your skin the care it deserves with this simple yet powerful rice remedy—and wake up every day to smoother, more luminous skin. ✨
Embrace Papaya Leaves for Youthful Hair!
Tired of spotting more white or gray hairs every time you look in the mirror? If you’re between 45 and 65 and searching for a natural, effective way to restore your hair’s youthful glow, papaya leaves might be your new best friend. Rich in powerful nutrients and antioxidants, these vibrant green leaves are more than just foliage — they’re a secret weapon for hair revival.
🌿 Why Use Papaya Leaves for Hair?
Papaya leaves have been traditionally used for their restorative and healing properties. When it comes to hair, they can:
Stimulate growth
Darken gray strands over time
Eliminate dandruff
Strengthen the scalp
Add shine and smoothness
Let’s explore the full range of benefits they offer.
✨ Key Benefits of Papaya Leaves for Hair
1. Gradually Restores Natural Hair Color
see continuation on next page
