How to make Flan Patissier
TIP: Work with puff pastry that has thawed just enough that it’s still stiff but workable, and JUST pliable enough to line the springform pan. This is for ease of handling for this tart which has unusually high sides. Fully thawed puff pastry = floppy and sticky = impossible to line the tin sides and very messy to fit the base in.
Cut base using the inside of the springform pan as a guide. Remove excess pastry but SAVE IT in case we need to do emergency patch ups later! Then place the base in the freezer until required.
Cut sides – Cut three 5.5 x 25 cm (2.15 x 10″) strips out of a sheet of puff pastry, ensuring it is still as frozen as workably possible so it doesn’t flop when you line the sides.
TIP: Using a long knife, cut straight down into the pastry rather than slicing by dragging the knife along the pastry. This will preserve the beautifully flaky layers on the rim of the crust, like pictured in this post.
Line sides
How to make Flan Patissier
Line springform pan with baking paper – Grease a 20cm / 8″ springform pan ring with butter then line the inner sides with baking paper cut to size. Place the ring on a sheet of baking paper sitting a plate. This is for ease of handling because we are not using the springform pan base. Baking the puff pastry shell directly on a tray guarantees the base remains 100% crispy once filled with the custard.
Baking paper actually isn’t essential, you could just butter or spray the sides with oil. However, the puff pastry tends to look more rustic (ie. flaky rather than neater) if you skip the baking paper.
Line sides with pastry – Line the inner sides of the springform pan with the pastry, overlapping by 1cm and using water to seal. You will need to trim the third strip so it fits.
Remember, work with stiff but just-pliable puff pastry else the sides will flop!
Press seams – At this stage, just press the seams; we will seal it properly later. Right now, we want to work fast while the pastry is still as frozen as possible.
Base
How to make Flan Patissier
Place base in by gathering it up slightly so it doesn’t drag down the sides. Adjust as needed to centre it as best you can. The circumference of the base will overlap and go up the sides ever so slightly, which is the perfect insurance policy to avoid custard leakage.
Seal seams – Use the back of a teaspoon to press the base into the corners, then to “smear” the now-thawing puff pastry to seal it. Do this for the base and the sides.
Prick and freeze
How to make Flan Patissier
Prick base with a fork about 30 times. This helps to stop the base from puffing up when we do the blind bake.
Freeze – Cover with cling wrap (with tart still sitting on the plate) then freeze for at least 2 hours. The purpose of freezing is to help reduce shrinkage when blind baking and also to help stop the tall puff pastry sides sliding down as it cooks.
The bonus is that the firmed crust doesn’t get all scratched up and dented when we line with paper and fill with baking beads to blind bake!
Blind baking the crust
Blind baking is an essential step to ensure that the crust bakes up nice and crispy. Nobody wants a soggy crust with their custard tart!!
How to make Flan Patissier
Bake with baking beads 25 minutes – The first bake is weighed down with baking beads to set the pastry sides so they don’t flop inwards. We bake in a hot oven of 220°C/430·F (200°C fan) which works better when baking from a frozen state.
Filling with baking beads – Remove the fully frozen crust from the freezer. Tear off 2 x 60cm / 2 foot-long sheets of baking paper (parchment paper) then scrunch them up in your hands. This makes it easier to fit inside this taller than usual pastry.
Lay one sheet of paper on top of the other but perpendicular to it (ie. in a “X”) inside the crust shell. Then fill with baking beads or dried beans* right up to 1cm below the rim of the pastry. Gently but firmly press the beads down and outwards to ensure it is pressed into the corners and against the springform pan walls to help ensure the pastry sides set properly without flopping inwards.
No baking beads? Large dried beans work almost as well. They do not conduct heat as well as purpose-made baking beads and they are a little lighter. So the pastry does shrink a little more but it’s not significant. Avoid using rice, lentils or other small dried things that other recipes say are ok to use. Their small size means they pack together too densely, blocking heat from getting through to the inside of the pastry so the sides don’t set properly. (A lesson I learned the hard way!)
Remove baking beads – After 25 minutes, remove the crust from the oven. Grip the paper overhangs and lift, taking the baking beads with the paper. Do this step slowly so you can check to see if the sides start to flop in (eg if your oven runs a bit cool). If they do, leave the baking beads in and bake for a further 5 minutes.
Take care during this step – nobody wants sizzling hot little beads bouncing all over their kitchen floor … sounds terribly dangerous! I pour the beads straight into a metal bowl to cool.
How to make Flan Patissier
Bake 5 minutes uncovered – Once the baking beads are removed, return crust to oven for a further 5 minutes.
Cool 10 minutes – Remove the crust from the oven. You will see that the surface is dry but the pastry is still a bit undercooked. That’s exactly what we want – it’s partially cooked, ie. Cooked enough so it won’t go soggy once the custard is poured in but undercooked enough so we don’t end up with a burnt, dry pastry crust.
Cool for 10 minutes. Again, this is just an extra crispy-base insurance policy.
Baking the Flan Pâtissier
We are on the home stretch here! So close are we to be able to taste the magic that is Flan Pâtissier!
How to make Flan Patissier
Fill with custard – Remove the chilled custard from the fridge and whisk to loosen. Then fill the pastry crust. Fill to 1cm / 0.4″ below the rim else it will overflow when it bakes.
Leftover custard? The recipe makes the right amount of custard assuming you had no pastry shrinkage or the sides did not slouch when you blind baked your pastry crust. If yours did shrink a bit – and for most people, I expect that it will – then you may have custard leftover. Ideas to use up: as a general-purpose dolloping custard on anything; make mini custard tarts using puff pastry scraps (20 minute bake at 180°C/350°F); fill ramekins and bake; or simply eat with a spoon!
Smooth custard surface using an offset spatula or spoon.
Egg yolk – Brush the surface gently with egg yolk, taking care not to break the surface. This is how we get that gorgeous, signature bronzing on the surface of the Flan Pâtissier.
Bake 65 minutes, fridge 6 hours – Bake 65 minutes at 200°C/390°F (180°C fan), rotating the tray at 45 minutes. The custard will still be VERY wobbly, borderline watery. Have faith! It will set when refrigerated.
Cool on the counter for 4 to 5 hours, then loosely cover and refrigerate for 6 hours+ in the springform pan. It’s important to fully cool to room temperature before refrigerating or condensation will compromise the crispiness of the puff pastry.
And with that, WE ARE DONE!! Time to devour this custardy masterpiece!!
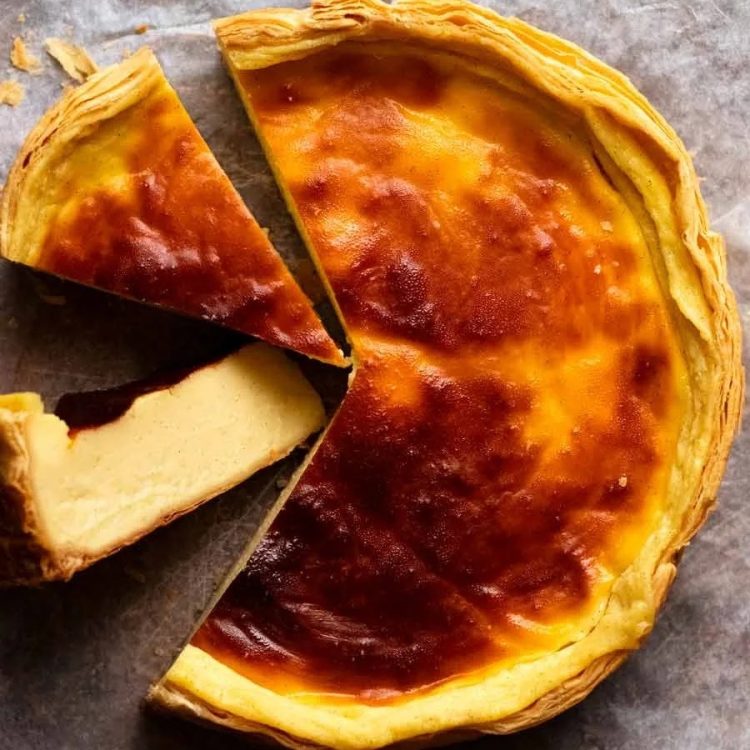
Freshly baked Flan Patissier
Close up showing the side of a slice of Flan Patissier
Creamy custard of Flan Patissier
