Cloud soft condensed milk bread is what I call the ultimate comfort in loaf form. Every time I bake it, the kitchen fills with a buttery-sweet aroma that’s hard to resist. As a chef, I’ve made hundreds of bread recipes, but this one stands out for its ridiculously tender crumb, subtle sweetness, and that shiny top that practically begs for a photo.
But hey don’t be fooled. It’s not all fluff and ease. Getting this bread just right means respecting the dough, understanding your yeast, and staying patient through the process. Still, once you get the hang of it, you’ll never go back to store-bought loaves again.
Why I Love Making Cloud Soft Condensed Milk Bread
Perfectly sweet and tender without being overpowering.
Great for toast, French toast, or enjoying plain with tea.
A therapeutic dough that’s a dream to knead and shape.
The best part? This recipe is soft enough to tear like cotton yet sturdy enough to hold a spread of jam or nut butter. I serve it during brunches, and people always ask if it’s store-bought. That’s the compliment I aim for!
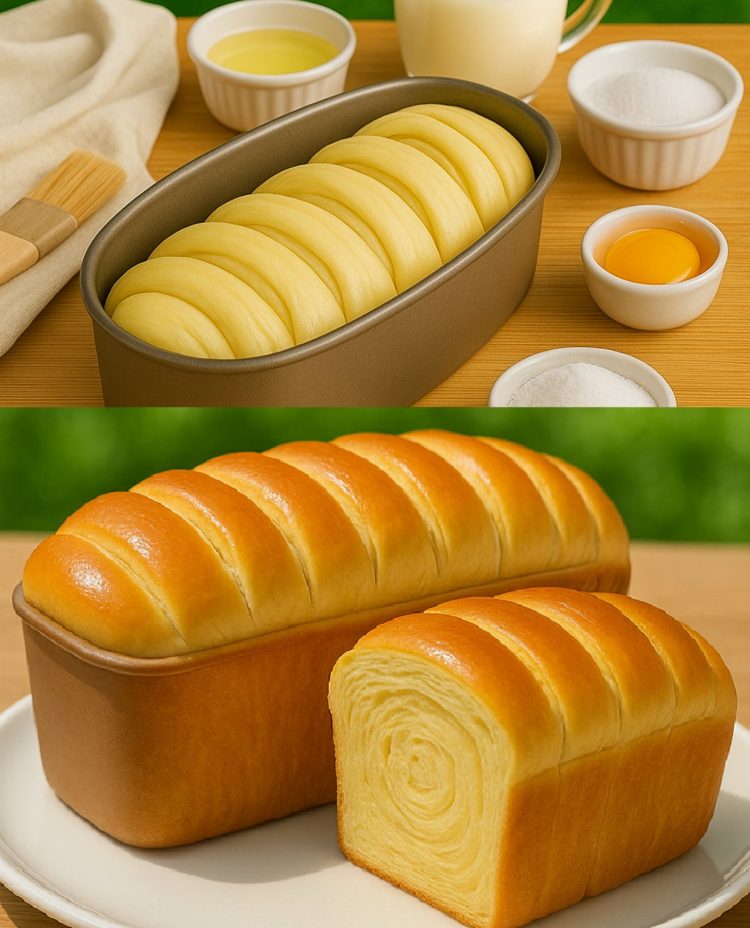
Step by Step Guide to Making Condensed Milk Bread
Ingredients You’ll Need
3 cups all-purpose flour
1/4 cup sugar
1 packet (2 1/4 tsp) instant yeast
1/2 tsp salt
1 cup warm milk
1/4 cup condensed milk
1 large egg
1/4 cup unsalted butter, softened
Glaze and Optional Topping
1/4 cup condensed milk (for brushing the top)
Honey butter (optional, for finishing)
Let’s Get Baking Step by Step Process
Step 1: Mixing the Dough
In a large bowl, combine flour, sugar, instant yeast, and salt. I always give this mix a good whisk to make sure the yeast disperses evenly clumping yeast is a beginner’s mistake I made more times than I care to admit.
In a separate bowl, whisk together warm milk (not hot!), condensed milk, and egg. Pour this mixture into the dry ingredients. Add the softened butter last, and mix everything until a dough forms.
“The dough should feel like memory foam bouncy, smooth, and a bit tacky.” @ChefKneadsIt
Step 2: Knead with Patience
Turn the dough out onto a lightly floured surface and knead it for around 10 minutes. Don’t rush this part. You’re building gluten, which gives that fluffy pull-apart texture.
The dough should be soft, slightly sticky, and elastic.
If it tears when stretched, keep kneading.
If it’s too dry, add a teaspoon of milk. Too wet? Sprinkle a little more flour.
Step 3: First Proof (Rise)
Grease a large bowl and place the dough inside.
Cover with a clean towel or plastic wrap.
Let it rise in a warm, draft-free area for about 1 hour, or until doubled in size.
I usually place it inside my (turned off) oven with the light on. It creates the perfect environment without any guesswork.
Shaping the Bread: Time to Braid
Step 4: Divide and Shape
Punch down the dough gently it should deflate with ease.
Turn it out onto a floured surface and divide into three equal parts.
Roll each part into a rope and braid them tightly, just like a challah loaf.
Place the braid into a greased loaf pan. I personally prefer non-stick ceramic pans they give the most even bake without burning the edges.
see continuation on next page
